Lots of assembling

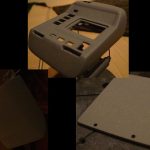
Next, I took the supplied nuts to secure the back access panel. I placed the nuts inside the main cavity and screwed them down using the included screws. I then carefully applied a bead of 5-minute epoxy around the base of the nuts to secure them to the tricorder body. Be very careful as not to epoxy the screws…


Read more

Painting some details

My next step was to add some minor paint detailing to the tricorder. I needed to paint the raised area on the top of the main body that outlines the main grouping of sequencing LEDs. I had noticed previously, that with the graphics in place, you can still see some of the inside surfaces of the LED holes. I…


Read more

More detailing

I finally was able to get some styrene, so I decided to finish up the detailing on the top array decal. I used some spray adhesive to glue the supplied template to a piece of 0.040″ thick styrene. After the adhesive dried, I cut each piece out with my Dremel, and used a combination of 400 grit sandpaper and…


Read more

Primer

Since I was happy with the body work following the splashcoat, I decided it was time to prime this puppy. So I applied three thin coats of Krylon’s gray primer (#1314) to each of the three components (the body, door, and back panel). Be sure to mask off the ID LED on the lower door before painting! After the…


Read more

Finishing up the viewscreen

It’s been awhile since I’ve had a chance to work on this, but I had some extra time this weekend, so I’m at it again. Following the splash coat from the previous step, I went over the main parts with some Squadron green putty, designed for smaller gaps, since that was primarily what was revealed by the splashcoat. I…


Read more

Splash coat

Well I lucked out with the weather and ended up having a warm enough day to get to the splashcoat. For those new to kit building, a splashcoat is a light coat of primer who’s purpose is to reveal any blemishes (seams, holes, cracks, etc) that may be otherwise invisible. Since I plan on using Krylon brand paint for…


Read more

Viewscreen prep work

Next I drilled a small hole into the back of the viewscreen bucket to allow for the LED that will backlight the viewscreen to fit through. I used a 1/8″ drill to make the hole, and I quickly test-fit the LED to make sure it easily fit through the hole without shorting the two leads. Then I took the…


Read more

Viewscreen

Today, I tackled the top portion of the viewscreen. The screen is composed of three main components; the viewscreen cover, the slide the serves as the viewscreen graphic, and the bucket that goes behind the slide. I took the provided piece that serves as the cover and trimmed it to the red lines on the template using a sharp…


Read more

Dry fitting the other components

Next up, I dry-fitted the viewscreen’s backing piece to make sure it fit properly into the recess behind the viewscreen. Some minor amounts of excess resin were carefully removed with a sharp xacto blade. As the picture shows, the piece fit with no problems after some minor trimming. My next step was to test-fit the electronics to make sure…


Read more

Putty

To finish up the primary body work, I filled any large gaps, holes, or seams with an automotive filler putty that the Bondo may have missed. To fill in the smaller, pin-size holes, I used Squadron’s Green putty. I let the putty dry overnight. The next day I proceeded to wetsand the main body components with 250 grit sandpaper….


Read more